Friday, December 30, 2011

Mapping the Area Around Estes Lake

 2010 Aerial shows existing conditions and current water levels. 

Our cabin is located on the top of the hill in the clearing on the west side of the map.  You can see its green roof.  In addition along the lake you can see Jay/Deanne's, Gary/Ginny, Kohane's as well as Ben/Becky's old cabin.

 1998 Color IR image shows historic conditions and water levels 13 years ago. 

When viewing CIR imagery green is represented as red.  The 98 aerial was taken during the leaf off time so the aerial really shows off the conifers in the area.  Alders are also easily seen as the lighter shade of black w/ the lake be the darkest shade of black.

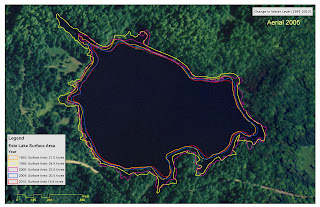
The 2010 and 1998 aerial scenes (above) combined w/ my interest in understanding why the lake levels have continued to drop since we built the cabin in 2007 have motivated me to do some research; which I hope you find interesting to read about below.   I began by gathering all the aerial photographs available for the area and digitized the extent of the surface water for each year availble.  The map below shows the results of this work which quatifies surface areas for the following years: 1992, 1998, 2005, 2009, 2010. Each year is represented by a different color w/ acre values quantified on the legend and on the chart below.  Aerials for each year can be seen below.


1992 Aerial and Water Level

1998 Aerial and Water Level

2005 Aerial and Water Level

2009 Aerial and Water Level

2010 Aerial and Water Level

When comparing surface water area between 1998 (yellow boundary repesenting the maximum water levels) and 2010 (Red Boundary representing the miniumum water levels) aerial photos there is about a         -20.5% loss of surface water area between the two time stamps.  I would estimate the average water depth to be about -8 FT.  So one can assume an average depth of -4 FT and multiply this by the change in surface area to estimates changes in water level:


Change in Surface Area -5.10 Acres
Pct Change over 25 Yrs -20.50%
Change in Volume: -884653.19 Cubic Feet
Change in Volume: 20.3 Acre-Feet

One might hypothesize that water levels on the lake might be mainly be controled by precipation and the amount of water available in the form of rain, snow and runoff.  Because the contributing drainage area is relatively small (see detailed drainage divides map below) and the lake is situated very close to a major watershed divde between the Sturgeon River and the Ontanogon River I chose not to plot out runoff as I suspect this to be a minor contriubutor. 

With this in mind I have compiled historic precipitation records going back to 1930.  The easiest and cheapest way I could figure out how to do this was to run an ArcSWAT model for annual flow and then summarize precipitation records.  Combined w/ the historic precipiation records I also compiled the historic surface water acreages and plotted them on the graph below.


The graph above shows a pretty strong correlation between rainfall (blue line on top of chart) and lake surface area (blocks overlaid on the rainfall chart above).   The strongest relationship I could find was w/ a 5-yr moving average which is deplayed as a best fit line on the top chart. The one outlier to that does not support this trend is in 1992.  I suspect this doesn't align w/ the others b/c of the large range in rainfall totals between 1991 and 1992.  In addition the aerial imagery in 1992 was acquired in the spring so it may not reprensent the timing of the precipation which occurred in 1992 with peak rainfall typically occuring in Aug/Sept which would be well after the imagery was collected. 

Here are a number of other interesting maps that may also be contributing variables to the changing water levels.

Regional slopes and topography for the area.  Red areas have the most topographic change while green areas are flatter or having less relief.

 Using 10m digital elevation model (DEM) detailed drainages lines and drainage areas were delineated to better understand surface water drainage patterns.


Map shows drinking wells that have been drilled in the area, their associated depth to groundwater as well as a surface showing depths to groundwater.  Difference between surface topography and ground water depth.  Blue areas show less depth to groundwater, while yellow areas show greater depth to groundwater.  The maps is missing one known well that was drilled about 100 yards west of Este Lake.


Potential impacts or ground water drawn down as a result of drinking wells are shown on map above (Brown shading represents ground water dwaw down: Darker the brown the more draw down potential exists).  Also shown on this map are detailed drainage boundaries and aquifer locations.  Based upon the season use of these wells it is not likely wells would have any impact on the lakes water level. 

Sunday, September 25, 2011

Off the Grid: Camp Shower

The shower system was relatively cheap and easy, providing large benefits to camp. Really a person can’t say enough about the luxury of a warm shower after playing hard all day. In fact I find myself looking forward to an afternoon or early evening shower in order to freshen up before bed or before a nice evening around the campfire. Next year we’ll be putting in a sauna but for the time this works extremely well.
There are essentially 3 pieces to the shower system. 1) Rain barrel, 2) RV pump (box), and 3) water heater/shower.

I was able to find a 55 gallon barrel from Craig’s list. They are relatively inexpensive; I think I paid around $10. They come in a variety of colors; I would have preferred black (collect sunlight and warm water) but, opted for blue as it had previously held food products as opposed an unsure chemical. I suppose this is the tricky part, making sure your barrel didn’t have a chemical that might do some damage to you. In order to construct the barrel I simply cut a hole in the top, using a sawzall, just large enough to get my arm in. I then drilled a hole about 6” from the bottom and screwed in a hose nozzle in. I sealed it w/ some multi-purpose marine grade sealant and a threaded screw on cap from the inside. The hole I cut in the top was closed up using fine screen which allows water in but keeps leaves, bug, etc out. So far I haven’t had any issues keeping the water fresh and free of debris.

The pump and box was a little more complicated (see picture). I essentially started by constructing a box out of 1/2” plywood. I did us a piece of cedar for the bottom but I’m not sure it’s necessary. I drilled a few holes in the bottom to allow for drainage if necessary. I put an “in” and “out” hose bib on each end of the box with a RV pump, inline screen filter and battery inside. The battery is just a lawn tractor battery. The pump is the Shurflow 4008; self priming, 3 GPM at 55 PSI performance (about $80). The pump maintains constant water pressure in the line and then shots off until more pressure is needed. The pump can also run dry w/out damage. There are a couple of additional things I did; put in a switch as part of the circuit which allows one to easily control the water and battery use. I also put an inline fuse in to protect the pump when I charge the battery. The battery is connected to the circuit via battery clips so that one can add or replace battery power if necessary. The clips could hook onto a car battery if portability is needed. Also between the pump and the rain barrel are a number of inline water filters/screens which prevent debris from going in and/or through the pump. I have a screened hose seal inserted at the hose bib that comes right out of the rain barrel. There is another finer one where the hose comes into the pump box and then a final one inside the box. This is the smallest diameter of all screens and is a self contained filter that can be purchased where ever you purchase your RV pump. Without the water heater/shower one can simply us the system as a hose, which has plenty of pressure. I would compare it to what my home hose can produce in terms of water quantify, distance and pressure. Also in the summer the water warms enough via the sun that the water heater is not necessary.
The water heater/shower is an Eccotemp L5 portable tankless outdoor water heater and shower which was purchased from Camper’s World but can also be bought online at several places. It runs around $120 but provides instant hot water with easy adjustment of flow and temperature. It hangs w/ one nail and has a connection for propane and water. So far I have been very happy w/ the purchase w/ the exception of the shower hose connections. The connections are made of plastic and don’t seal well. If you put any pressure/torque on them they strip out. I’ve gotten around this problem by simply replacing the shower hose w/ one that is a bit higher quality and metal threading. The nice thing about shower that came w/ the system is that it has an on/off switch which allows you to turn off the shower and save water when suddsing up. Everything else works beautifully. The shower came with all the necessary adaptors, couplers and seals. We have also purchased a shower tent. We are still working on fine tuning the entire system and where we want it at camp but for the time a shower sure has made life nice.

Saturday, May 14, 2011

MI Steelhead: Muskegon, Pere Marquette and Big Manistee


In desperate need of a break from work a couple days on the river always provides the recharge needed for a strong comeback.  We fished the Muskegon, PM and Big Man catching fish at each.  On day one we dodged some serious thunderstorms, golfball sized hail, and a tornado which was spotted just north of our takeout. Day two showed great improvement in terms of weather and fishing. We fished until noon, landing good numbers of beatiful steelhead.  We managed to catch this hook up on the camera late in the day after already boating a few.

Tuesday, April 19, 2011

Another Day in Paradise

With great anticipation and excitment we packed up for an extended weekend to the UP's Great Outdoors. As I recall yesterday was 75 degrees F but today as we pack the wind is howling and the temps have drop to the mid 30's. All reports and passing conversations suggest a wintery weather weekend but with work and the hustle and bustle of eveyday life who has the time to reschedule a fun get away just b/c of some "wintery forecasting"?

After all every weather report I have heard in the UP throughout the last 3-years predicts 20-40% chance for rain changing to snow, July, Aug, Sept, it really doesn't matter. The other thing I've noticed about the weather up there is you really never know how much snow they are predicting b/c they just continue to add the amount of snow that will becoming. For example when listening to the radio yesterday in morning I heard 3-4 inches, at noon I heard to expect 2 inches, by 3 pm the forecaster describes 4-6 inches. Well be the end of day there was 12". So does that all added up; and how would I have ever known that from each separate set of predictions ranging in intervals of 1 to 6 inches? Honestly I wouldn't be surprised if i just uncovered the secrets of the UP Weatherman. 1) Always predict some rain and a chance for snow, 2) Never, ever provide an overall accumulation, rather just keep adding up depths w/out providing a start or end time.

Anyway getting back to the weekend; so we trek off to north country w/ great expectations until hitting significant weather just north of Wausau; Rain, ice and than snow.  Now peering through a 2 inch by 6 inch clearing in the windsheild that continues to shift from the left to the right side of the steering wheel we decide to stop in Rhineland, to replace our brand new wipers. Apparently they now make standard wipers not capable of fighting through freezing rain and snow! So we decided not to cut any corners this time dropping $40 on rainex's cadillac of wipers. Which by the way were worth every cent. Well after a traditonal 5 hour drive taking nearly 9 hours we arrive at the cabin, w/ "slightly" less enthusiasm than when we started. 

The next morning we woke to blizzard conditions, 35 mph winds and horizontal snow.  Trying to have a fresh spring attitude it must be time for a nice soothing cup of hot chocolate.  Than it was time to go for a walk, after all we drove all this way!  Well by 7 pm that night the accumulation is causing us to question our perserverance.  With a couple passing conversations Kris and I make the call.  We were nervous that the accumulation would prevent us from safely getting out to pavement and w/ a two year old we're in no position to take any risks.  So we pack our things and I go to start the truck only to hear a subtle but quick click, click, clicking noise after turning the key; a sure giving away of a dead battery.  I definitely recall a sinking feeling as thoughts and scenerios race through my head, extra battery/no, battery charger/no, options, THINK, THINK, THINK.

Well, step 1 will mean I need to inform the rest of the family about the dead truck and the fact that we aren't leaving tonight.  So delivering the bad news didn't make me very popular.  There was limited finger pointing about leaving the lights on too long last night and mentions of better communication and how its important to listen and how I'm in charge of vehicle mainentence.  Really all expected conversation considering the situaiton.   So playing through the options, there was a 12 volt adaptor on the generator. Thinking this through I really thought it looked like an after thought to the overall design of the machine.  Perhaps it was a last minute desicion of some marketing person who insisted the generator would be a better sell if we said it had a 12 volt charger option.  So some engineer probably through the design together late the night before things went to production.  Well being unaware of any type developments of this machine, I was stuck playing around w/ a couple hoky screws and left over wire in the blowing snow and lingering darkness. 

With no luck I decide to wait until morning when I pick up where I left off getting more and more annoyed w/ this whole 12 volt thing on the generator dreaming up other scenerios as to why or how this became an option on this machine. Well the picture below really tells the rest of the story.  Sunday isn't a good day to make calls, as the local gas station isn't open and there aren't many options w/in walking distance of Este Lake.  Even if there were it would have been a six mile walk one way in the blowing snow;which left me thinking, "is thing really an option"?  Well to end a story, I will say  I am very gratefull to Sergent Dan of the Houghton County Sheirff's department and his deputy for coming out and providing us w/ a jump start and personal escourt to pavement.  I suppose it was just another weekend in paradise.


Wednesday, January 26, 2011

Preparing for Winter

For us, getting to the cabin in the winter requires a 5 mile x-country excursion from the nearest plowed road.  This wouldn't be such a big deal if we had a snowmobile; but having put our last dime into the cabin we get by w/ a pair of ski's.  Needless to say by the time you get to the cabin things need to be in order for a comfortable stay.  After making our first winter trip, here is a quick list of things that we realized we should have done in late fall in order to be better prepared for winter:
  • Fill Propane and have an extra portable propane tank for the time things run out
  • Extra gas for the generator, latern, etc.
  • Have a bucket of sand set in a handy spot for the stairs
  • Cut lots of wood and then a little more
  • Extra pair of snowshoes
  • Think about putting in a cellar; vegetables in a bin aren't eatible after freezing
  • Portable ice shanty and extra fishing set (rod, scooper, auger); perhaps a ground blind would double as a portable ice shanty.  Fishing w/out a shanty in the UP is doable but difficult on a cold blustery day!
  • Pair of slippers or house shoes; cabin floor is cold and it would be nice to walk out on the porch w/out having to put on shoes
  • Tire chains, rope, high jack, chain saw, jumper cables and comealong all seem like necessities
  • Drinking water from fall, which is now a frozen block, is of value as it melts slowly and provides good cold drinking water after a day or two in the cabin.  This is a good boast to melting snow supplies can be slow and time consuming
  • Emergency plan for evaculation; phone numbers and know methods for emergency contact


Map of Readers